Pod, Service, and Deployment
1. Big Picture
- In Docker, you run containers directly.
- Docker Swarm manages containers
- In Kubernetes, you run pods, which wrap account containers.
- A node is a machine (physical or virtual) where pods live.
2. Pods: Containers and Node Abstraction
What is a Pod?
- A pod includes one or more containers plus additional share resources.
- Shared resources include, but are not limited to, shared IP (internal/external) and storage volumes.
- Example pod: one
nginxwebserver container plus onelog-shippersidecar container plus shared volume for log data.
- Pods are scheduled onto
nodesby the kube-scheduler.
Pod and physical (virtual) node
- Each node runs a kubelet agent.
- Kubelet talks to the container runtime (containerd in Rancher Desktop).
- When a pod is deployed, kubelet pulls the associated container image(s) and runs it(them).
    graph TD
        subgraph Node1["Node (VM)"]
            Kubelet1["kubelet + runtime"]
            subgraph Pod1["Pod"]
                Nginx["Container: Nginx"]
            end
        end

        subgraph Node2["Node (VM)"]
            Kubelet2["kubelet + runtime"]
            subgraph Pod2["Pod"]
                Redis["Container: Redis"]
            end
        end

        Kubelet1 --> Pod1
        Kubelet2 --> Pod2
Hands-on with Rancher Desktop
- Verify that your Rancher Desktop is up and running
- Create a file called
nginx-pod.yamlwith the following content
apiVersion: v1
kind: Pod
metadata:
    name: nginx
    labels:
        app: nginx
spec:
    containers:
    - name: nginx
      image: nginx:latest   # pulls Docker/OCI image
      ports:
      - containerPort: 80
- Run
kubectland provide path to yournginx-pod.yaml. In the example below, I am in the same directory as my file.

3. Services: Stable Access to Pods
At this point, if we try to access the above pod using the containerPort 80, it will fail.
Problem
- Pods are
ephemeral- Pods can restart and be rescheduled onto different nodes.
- Each pod gets a random IP inside the cluster.
- How does a client reliably connect to
nginxif its internal IP changes?
- Docker:
-Pand-pis not adequate for this.
Solution
- Kubernetes Service
- A
ServiceprovidesPodswith astable virtual IPandDNS name. Serviceload-balances traffic to all matching Pods vialabel.
Connection to Physical Node
- A
ClusterIPservice gives access only inside the cluster. - A
NodePortservice opens a port on every node's IP. - A
LoadBalancer(on cloud) provisions an external IP (if available).
Hands-on with Rancher Desktop: Adding service to pod
- Create a file called
nginx-svc.yamlwith the following content
4. Deployment
Note
- Pods creation using
kubectland Pods-only YAML files is a manual process.- Pod IP addresses will be ephemeral and changed when a Pod crashes/is deleted/is rescheduled.
- Best practice:
- Avoid creating bare Pods in production
- Use
Deployment(orStatefulSets,DaemonSets) to manage Pods - Combine with
Serviceto maintain stable networking access.
Example
Step 1: Delete existing pods and services
- Assuming that you have been working on this lecture continuously, you will have one
nginxpod and onenginxservice running. Use the following commmands to check the existence of the pod and service, then to delete the pod and service. After deletion, check again to confirm that the pod and service are gone.
kubectl get pods -o wide
kubectl get svc -o wide
kubectl delete pod nginx
kubectl delete svc nginx
kubectl get pods -o wide
kubectl get svc -o wide

Step 2: Create deployment
- In Kubernetes,
DeploymentandServiceare distinct objects, usually defined in separate YAML files.Deployment: workload management (replicas, rolling updates, Pod templates).Service: network exposure (ClusterIP, NodePort, LoadBalancer).
- However, it is common practice for examples and small apps to combine them into a single YAML file, using
---as a separator. - Create a file called
nginx-deployment.yamlwith the following content
apiVersion: apps/v1
kind: Deployment
metadata:
name: nginx-deployment
spec:
replicas: 2
selector:
    matchLabels:
    app: nginx
template:
    metadata:
    labels:
        app: nginx
    spec:
    containers:
    - name: nginx
      image: nginx:latest
      ports:
      - containerPort: 80
---
apiVersion: v1
kind: Service
metadata:
name: nginx-service
spec:
type: NodePort
selector:
    app: nginx
ports:
- protocol: TCP
  port: 80
  targetPort: 80
  nodePort: 30007
Step 3: Deployment
How does this work?
- Deployment
- Ensures 2 replics of
nginxPods always run - Each Pod get a random IP inside the cluster.
- Ensures 2 replics of
- Service
- Select all Pods with
app: nginx. - Provide a stable virual IP and DNS name (
nginx-service) - Expose port
30007on every node.
- Select all Pods with
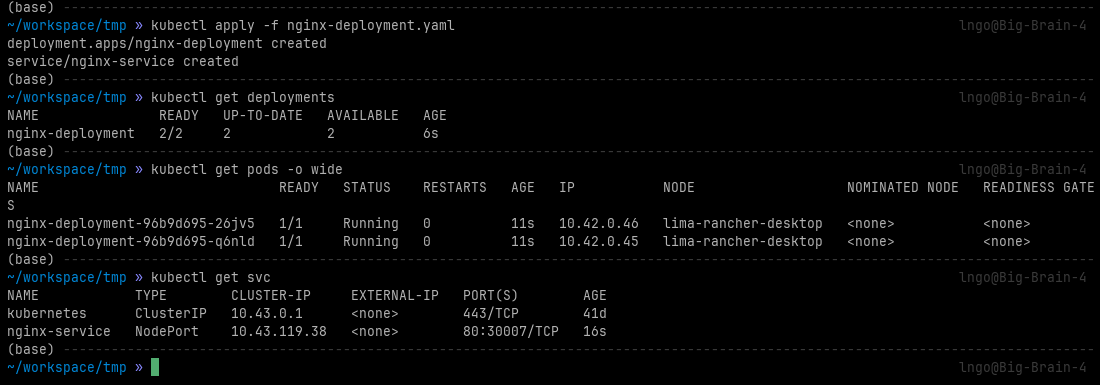
kubectl apply -f nginx-deployment.yaml
kubectl get deployments
kubectl get pods -o wide
kubectl get svc
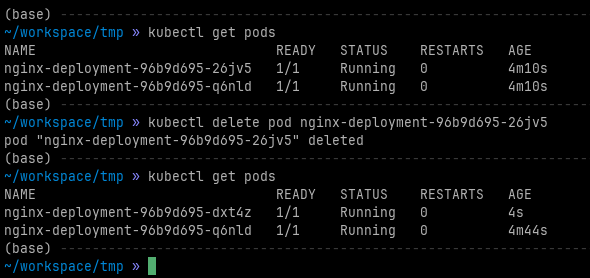
Step 4: Test recovery
- From the outcomes of
kubectl get pods -o wide, delete one pod. - Check again and observe how
nginx-deploymentimmediately create a replacement pod.